Mostrando las entradas para la consulta hagaloustedmismo ordenadas por fecha. Ordenar por relevancia Mostrar todas las entradas

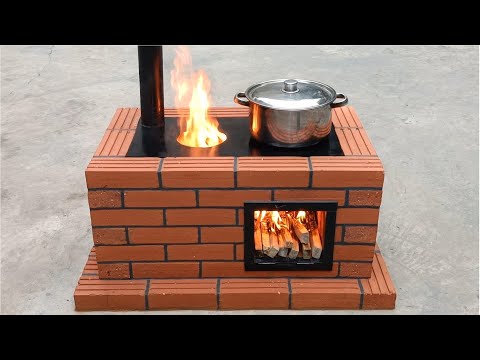
Building a Versatile Red Brick and Clay Wood Stove: An Anthropological and Historical DIY Approach

The desire to harness fire for warmth and sustenance is as old as humanity itself. Throughout history, diverse cultures have developed ingenious methods for containing and directing heat, shaping not only their physical environments but also their social structures and daily routines. This exploration delves into the construction of a multi-purpose wood stove, using readily available materials like red brick and clay. More than a mere practical guide, this endeavor invites us to connect with ancestral knowledge, understanding the principles that guided our forebears in creating essential domestic technologies.

The intention behind this article is to satisfy a search for practical, historically informed, and intellectually stimulating DIY projects. Readers interested in **anthropology**, **sociology**, **history**, and **sustainable living** will find value in understanding the cultural significance and technical execution of such a build. We aim to bridge the gap between academic understanding and hands-on application, recognizing the inherent human drive to create and adapt.

Introduction: Fire, Hearth, and Humanity

The image of the hearth, a central source of warmth and a gathering point for families, is deeply embedded in the human psyche. For millennia, the ability to control fire and channel its heat has been fundamental to survival and the development of civilization. This article revisits this primal connection, offering a guide to constructing a functional, multi-purpose wood stove using humble, yet effective, materials: red brick and clay. We will explore the historical and anthropological significance of such domestic structures, followed by a practical, step-by-step guide for its creation. This is more than a DIY project; it's an opportunity to engage with enduring human ingenuity.

The Hearth as a Cultural Nexus: Historical and Anthropological Perspectives

The evolution of human dwellings is intrinsically linked to the management of fire. Early humans sought shelter in caves that offered natural protection and existing fire pits. As societies developed, the hearth transitioned from a simple fire pit to a more sophisticated structure, becoming the heart of the home. In many cultures, the hearth was not merely a place for cooking and heating but also a symbolic center, a sacred space where rituals were performed and stories were shared. The communal aspect of the hearth fostered social cohesion and transmission of knowledge.

Anthropological studies often highlight the hearth as a key element in understanding social organization. The proximity to the fire influenced sleeping arrangements, food preparation hierarchies, and even the spatial layout of settlements. The development of more permanent hearths, like those built with stone or brick, marked a significant step towards settled agricultural societies. These structures represent an early form of environmental adaptation and technological advancement, demonstrating humanity's ability to manipulate its surroundings to improve quality of life.

"The hearth is the oldest altar in the world; the hearth is the hearth of home." - Unknown

From the simple cooking fires of nomadic tribes to the elaborate masonry stoves of medieval Europe and the intricately tiled Kachelofens of Germany, the design and function of hearths have varied immensely, reflecting local resources, climate, and cultural practices. Understanding these historical precedents enriches our appreciation for the basic wood stove we aim to build.

The study of these ancestral technologies offers profound insights into Comprender Culturas and Comprendiendo la Humanidad. It allows us to appreciate the **resourcefulness** and **practical intelligence** that have characterized human existence throughout the ages. This project, therefore, serves as a tangible link to our past, enabling us to recreate and utilize a technology that has sustained communities for millennia.

Understanding Your Materials: Red Brick and Clay

The choice of materials is crucial for any DIY project, and for a wood stove, it directly impacts its efficiency, durability, and safety. Red brick and clay are historically significant and readily available materials that possess excellent thermal properties.

  • Red Brick: Traditional fired red bricks are durable and can withstand high temperatures. They offer good thermal mass, meaning they absorb and retain heat, releasing it slowly over time. This property is essential for maintaining a consistent temperature within the stove and radiating warmth into the living space. The composition of red brick, typically clay and shale, gives it its characteristic strength and heat resistance.
  • Clay: Natural clay, when properly sourced and prepared, acts as an excellent binder and sealant. Its ability to withstand heat and its plasticity when wet make it ideal for joining bricks and filling gaps, ensuring the stove is airtight and efficient. Different types of clay have varying properties, and understanding the local soil composition can be key to selecting the right material.

The principle behind a wood stove is to create a contained environment for combustion that maximizes heat transfer while minimizing smoke and inefficiency. The design must consider airflow for a controlled burn and insulation to retain heat. The combination of red brick and clay provides a robust and natural solution, echoing the methods employed for centuries.

"The art of masonry, when applied to the construction of a hearth or stove, becomes a dialogue with heat, earth, and time. It is a craft that requires patience, understanding of materials, and a deep respect for the elemental forces at play."

DIY Workshop: Constructing Your Multi-Purpose Wood Stove

This guide outlines the basic steps for building a simple, multi-purpose wood stove. Adaptations may be necessary based on available space, local materials, and specific needs. Remember, safety is paramount; always work in a well-ventilated area and wear appropriate protective gear.

  1. Site Preparation:

    Choose a stable, non-combustible surface for your stove. A concrete slab or a thick layer of sand and gravel is ideal. Ensure adequate clearance from walls and any flammable materials. Consider ventilation, especially if indoors, and consult local building codes if applicable. This stage echoes the foundational planning found in many ArquitecturaIndígena projects, where site selection was critical.

  2. Foundation and Base Layer:

    Lay down the first course of red bricks to form the base of the stove. Use a mixture of clay and sand as mortar. This layer provides a stable foundation and initial thermal mass. Ensure the dimensions are appropriate for your intended use.

  3. Constructing the Firebox Walls:

    Build up the walls of the firebox, layer by layer, using red bricks and your clay mortar. Leave openings for the firebox door and an ash removal area. The bricks should be laid tightly together to minimize air leaks. You might incorporate a metal grate for the firebox floor for better airflow and easier ash removal.

  4. Creating the Chimney Flue:

    A crucial component for safety and efficiency is the chimney or flue. This directs smoke away from the living space. You can construct this using more bricks or a pre-fabricated metal pipe, ensuring it is securely sealed to the firebox structure with clay mortar. Proper height and draft are essential.

  5. Incorporating a Cooking Surface:

    For a multi-purpose stove, design the top layer to accommodate cooking. This could be a flat surface made of fire-resistant stone or metal plates set into the brickwork. Ensure the cooking surface is positioned directly above the hottest part of the firebox.

  6. Applying the Clay Render:

    Once the brick structure is complete, apply a thick layer of prepared clay mixture over the entire exterior. This acts as an insulator, sealant, and a protective outer shell. Smooth the surface for a clean finish. This render is analogous to plasters used in historical dwellings across various cultures, such as those found in CulturaIndígena contexts.

  7. Drying and Curing:

    Allow the stove to dry thoroughly for several days, or even weeks, depending on the climate. Once dry, initiate a series of small, controlled fires to gradually cure the clay and bricks. This slow curing process prevents cracking and ensures the stove’s longevity.

This process mirrors the fundamental principles of DIY and **hands-on learning** that have been central to human development, transcending cultural and temporal boundaries. It’s an exercise in understanding material science and physics through practical application.

Beyond Heating: Multifaceted Applications

While the primary function of this wood stove is heating, its design lends itself to a variety of other uses, embodying the "multi-purpose" aspect. Historically, hearths were central to virtually all domestic activities.

  • Cooking: The most evident secondary function. The top surface can be used to boil water, stew food, bake bread in a Dutch oven placed on top, or even fry using a cast-iron skillet.
  • Water Heating: A metal tank or coils can be incorporated into the design near the firebox to heat water for domestic use.
  • Drying: The residual heat can be used to dry herbs, grains, or clothing.
  • Space Heating: The primary function, providing radiant heat to living spaces, much like traditional Europa Antesde1914 homes.

The versatility of the stove underscores the efficient, integrated approaches to resource management seen in many traditional societies. It's a testament to how a single technology can serve multiple essential functions, a concept explored in Reflexiones Antropológicas.

Safety First: Essential Considerations

Building and using a wood stove requires a strong emphasis on safety. Failure to adhere to safety guidelines can lead to fires, carbon monoxide poisoning, or structural damage.

  • Ventilation: Ensure adequate airflow for combustion and proper venting of smoke. Install carbon monoxide detectors.
  • Clearances: Maintain sufficient distance from combustible materials.
  • Fuel: Use dry, seasoned wood. Avoid burning treated lumber, plastics, or trash, as these can release toxic fumes.
  • Structural Integrity: Regularly inspect the brickwork and clay mortar for cracks or signs of wear.
  • Chimney Maintenance: Keep the chimney clean to prevent creosote buildup, a major fire hazard.

These safety protocols are universal and reflect a deep understanding of the potential dangers associated with fire, a theme prevalent in the study of Sociología Digital's concerns with risk management and in historical accounts of Conflicto Armado and its impact on civilian populations.

Frequently Asked Questions

What kind of clay is best for mortar?

A natural, unfired clay with good binding properties is ideal. You can test local soil by making a few small bricks or balls and letting them dry. If they hold together without significant cracking, they are likely suitable. Often, a mixture of clay and sand (e.g., 1 part clay to 2 parts sand) provides the best balance of plasticity and strength, preventing excessive shrinkage.

How long does a clay and brick stove last?

With proper construction, regular maintenance, and careful use, a well-built red brick and clay stove can last for many years, potentially decades. Periodic repairs to the clay render or mortar may be necessary.

Can I build this indoors?

Yes, but it requires careful planning for ventilation and fire safety. A dedicated chimney system is essential to exhaust smoke and combustion byproducts safely outside. Always consult local building codes and consider professional advice.

What are the advantages of using natural materials like brick and clay?

Natural materials are often more sustainable, locally sourced, and possess excellent thermal properties. They are also generally less expensive than manufactured alternatives and connect the builder to traditional building techniques.

How do I ensure good airflow for the fire?

The design should include controlled air intake vents, often at the base of the firebox. A grate at the bottom of the firebox also allows air to circulate underneath the fuel. The chimney's draft is also critical for drawing air into the stove.

Conclusion: Reconnecting with the Primal Craft

The construction of a red brick and clay wood stove is more than a practical exercise in building; it's an act of rediscovery. It connects us to fundamental human needs and the ingenuity that has shaped our history. By understanding the materials, the principles of combustion, and the cultural significance of the hearth, we engage in a form of intellectual and physical **DIY** that is both rewarding and enlightening.

This project invites reflection on our relationship with technology, sustainability, and our ancestral past. It demonstrates that even with simple materials, profound and functional creations are possible. It’s a call to embrace the skills that have sustained humanity for millennia and to find joy in building something tangible and useful with our own hands, echoing the spirit of Hagaloustedmismo.

Scholarly Inquiry into the Crafting of Ingenious Devices: The Pen Gun as a Case Study in DIY Ingenuity

Introduction: The Allure of Ingenuity

The creation of functional objects from seemingly mundane materials has long captivated the human imagination. This fascination stems from a deep-seated drive for self-sufficiency, problem-solving, and the sheer intellectual satisfaction of transforming abstract knowledge into tangible reality. The concept of a "pen gun," a device that ingeniously integrates a projectile-firing mechanism within the form of a common writing instrument, exemplifies this inherent human ingenuity. This exploration delves into the historical, sociological, and anthropological underpinnings of such creations, moving beyond mere mechanical instruction to understand the broader cultural and psychological drivers behind the "Do It Yourself" (DIY) ethos. We will examine the historical precedents, the sociological implications of self-made technologies, and the anthropomorphic roots of tool-making, ultimately providing a structured approach to understanding and, where appropriate, ethically engaging with such inventive practices.

Historical Context: The Evolution of Improvised Tools

Throughout history, individuals and groups have demonstrated remarkable resourcefulness in adapting and repurposing existing objects for new functions, often driven by necessity or a desire for enhanced capabilities. The creation of improvised weaponry, while often associated with conflict, is a testament to this enduring human trait. From early projectile technologies to the more complex, albeit often crude, devices of later eras, the impulse to innovate and adapt has been a constant. The "pen gun" concept, while appearing contemporary in its slick presentation, resonates with historical precedents of concealed or dual-purpose tools. These creations often blur the lines between utility, defense, and even performance art, reflecting a complex interplay of human needs and creative expression.

The act of creation, especially when it involves repurposing familiar objects, speaks to a fundamental aspect of human cognition: our ability to perceive affordances and to imagine novel applications.

The evolution of such devices is not solely a technological narrative; it is also deeply intertwined with social and cultural contexts. The desire to create discreet or unexpected tools can stem from various motivations, ranging from personal security to playful experimentation. Understanding these historical threads provides a crucial backdrop for appreciating the ingenuity behind the concept of the pen gun.

Sociological Dimensions: The "Do It Yourself" Ethos

The "Do It Yourself" (DIY) movement, in its broadest sense, represents a cultural embrace of self-reliance and practical skill acquisition. In a world often characterized by mass production and specialized labor, the DIY ethos offers a counter-narrative, emphasizing individual agency and the satisfaction derived from creating, repairing, or modifying objects. The creation of a pen gun, as showcased in various online demonstrations, can be viewed through this sociological lens. It embodies the DIY spirit by transforming common materials into a functional, albeit unconventional, device.

This movement extends beyond mere hobbies; it fosters a community of makers and innovators who share knowledge and techniques. Platforms like YouTube and dedicated forums become hubs for this exchange, facilitating the dissemination of complex instructions and inspiring further creativity. The accessibility of information, coupled with readily available materials, democratizes the process of invention, allowing a wider range of individuals to engage with technical challenges.

The DIY ethos is more than just building things; it's about empowerment, knowledge sharing, and a rejection of passive consumption.

Sociologically, the interest in such projects can also reflect anxieties about personal safety, a desire for self-defense, or simply a fascination with the mechanics of everyday objects. It taps into a primal human desire to control one's environment and to possess the skills necessary to navigate it effectively. For a deeper dive into the social dynamics of maker culture, one might explore resources on SociologíaDigital and the broader impacts of ComunidadAntropológica in the digital age.

Anthropological Perspective: Tool-Making as Human Expression

From an anthropological standpoint, the creation of tools is one of the defining characteristics of the human species. It is not merely about functionality; it is a deeply ingrained aspect of human culture and expression. The impulse to craft, modify, and improve upon existing tools speaks to our cognitive abilities, our capacity for symbolic thought, and our drive to shape the world around us.

The pen gun, as a conceptual object, can be analyzed as a complex tool that merges two distinct functions: writing and projectile propulsion. This synthesis reflects a sophisticated understanding of mechanics and materials. Anthropologically, such inventions highlight our species' continuous exploration of the boundaries between the familiar and the functional, the everyday and the extraordinary. It underscores the human capacity for innovation that often transcends immediate practical needs, venturing into the realm of cleverness and even artistry.

Furthermore, the act of documenting and sharing such creations through platforms like video-sharing sites speaks to a contemporary form of oral tradition, where knowledge is passed down through visual and auditory means. This mirrors ancient practices of knowledge transmission, albeit in a vastly accelerated and globally connected format. Examining the HistoriaLingüística and CulturaYLenguaje can offer further insights into how humans conceptualize and communicate complex ideas through tangible forms.

DIY Guide: Constructing a Functional Improvised Device

While the specific construction of a "pen gun" involves intricate mechanics and potentially hazardous materials, we can adapt the principles of DIY ingenuity to a more accessible and educational project: building a simple, non-firing replica or a device that demonstrates basic mechanical principles safely. This guide focuses on the process of creative construction using common materials, emphasizing understanding over replication of potentially dangerous mechanisms.

  1. Conceptualization and Design: Begin by sketching your idea. For this exercise, let's focus on creating a *stylized* pen-like object that incorporates a *visual representation* of a projectile mechanism, or a simple spring-loaded action for a lightweight object (like a cork or a small foam dart). Consider the form factor of a pen: a cylindrical body, a cap or click mechanism, and a tip.
  2. Material Selection: Gather common household items. For the main body, you might use a sturdy plastic tube, a thick marker casing, or even rolled cardboard. For decorative or structural elements, consider craft sticks, bottle caps, aluminum foil, or modeling clay. For a simple spring-loaded mechanism, a retractable ballpoint pen mechanism can be a safe starting point.
  3. Body Construction: Assemble the main body of your "pen." If using a tube, ensure it is clean and smooth. If rolling cardboard, use strong adhesive or tape to secure the shape. Aim for a comfortable grip, similar to a standard pen.
  4. Mechanism Integration (Simulated/Safe): If using a retractable pen mechanism, carefully extract it. You will need to secure this within your custom pen body. This might involve fitting it snugly or using a bit of adhesive. For a purely visual representation, you could embed a small, non-functional spring or a coiled piece of wire to suggest the internal workings.
  5. Detailing and Finishing: Use modeling clay, foil, or paint to add details that enhance the "gun" aesthetic without creating a functional firearm. Think about adding sights (purely decorative), different textures, or metallic finishes. Ensure all parts are securely attached.
  6. Testing (Safety First!): If you've incorporated a safe spring mechanism for a light object, test it in an open area with clear boundaries. Ensure the object being propelled is soft and poses no risk. The primary goal is to demonstrate the *principle* of a spring-loaded action, not to create a projectile weapon.

This exercise emphasizes the creative process, problem-solving, and material manipulation inherent in the DIY spirit, without venturing into dangerous territory. For further exploration into practical DIY projects, consider the tags DIY and hagaloustedmismo.

Ethical Considerations and Responsible Innovation

The exploration of creating devices like pen guns necessitates a serious discussion of ethical implications. While the ingenuity behind such inventions can be fascinating, their potential for misuse raises significant concerns. The proliferation of information regarding the construction of potentially harmful devices, even when presented in an academic or entertainment context, requires careful consideration of societal impact.

Responsible innovation demands that creators and consumers alike engage with technology ethically. This includes understanding the legal ramifications, the potential for harm, and the broader societal context in which such devices exist. The aim should always be to foster knowledge and creativity in ways that are constructive and safe, rather than enabling or glorifying potentially dangerous activities.

Innovation without ethical consideration can lead down dangerous paths. True ingenuity lies not just in creation, but in ensuring that creation serves humanity.

For those interested in the intersection of technology and ethics, exploring topics such as Ciberseguridad, SeguridadGlobal, and the ethical frameworks surrounding scientific advancement is highly recommended. The responsible dissemination of knowledge, particularly concerning sensitive topics, is paramount.

Frequently Asked Questions

Q1: Is it legal to make a pen gun?
The legality of manufacturing and possessing such devices varies significantly by jurisdiction. In many places, creating or owning any item that can be easily concealed and used as a weapon is strictly prohibited and carries severe legal penalties. It is crucial to be aware of and comply with local laws and regulations.

Q2: Are there safe ways to explore the principles behind a pen gun?
Yes. Instead of focusing on functional weaponry, one can explore the underlying mechanical principles by building non-firing replicas or simple spring-loaded mechanisms for launching soft, harmless objects. This allows for an understanding of engineering and design in a safe and educational manner. Resources on DIY projects and basic mechanics can provide safe alternatives.

Q3: What are the primary motivations for creating such devices?
Motivations can be diverse, ranging from a fascination with engineering and problem-solving to a desire for self-defense, or even as a prop for creative projects. The "maker" culture often drives individuals to explore the limits of transforming everyday objects into novel tools.

Q4: How can I learn more about historical improvised weapons?
Historical research into periods of conflict, wartime ingenuity, and the development of specialized tools can provide context. Academic databases, historical archives, and specialized books on military history or espionage often contain information on such subjects. The tag ExploraciónHistórica is relevant here.

Conclusion: Beyond the Gadget

The concept of a pen gun, while seemingly a niche and potentially controversial topic, serves as a potent microcosm for understanding broader themes of human ingenuity, the DIY ethos, and the enduring relationship between humans and tools. It challenges us to look beyond the superficial mechanics and consider the underlying motivations, historical contexts, and ethical responsibilities that accompany the act of creation. By dissecting such inventions through the lenses of history, sociology, and anthropology, we gain a richer appreciation for the complex tapestry of human innovation. The true value lies not in the replication of specific devices, but in fostering an understanding of the principles of design, problem-solving, and responsible application of knowledge. As we continue to innovate, let us remember the imperative to do so ethically and with a clear vision for a positive impact on society, embracing technologies that build and connect rather than divide or harm. For further contemplation on human ingenuity and its societal implications, consider exploring tags such as ComprendiendoLaHumanidad and ReflexionesAntropológicas.

DIY Intellectual Construction: The Art of the Paper Fortune Teller Through Historical and Anthropological Lenses

Introduction: Beyond the Game

The simple paper fortune teller, often crafted in childhood classrooms or during idle moments, transcends its seemingly trivial nature. Far from being a mere toy, this artifact represents a convergence of historical practices, anthropological rituals, and fundamental human desires for prediction and social engagement. This article delves into the multifaceted world of the paper fortune teller, exploring its roots in divination, its role as a tool for social interaction, and how its construction can serve as a powerful metaphor for intellectual "do-it-yourself" (DIY) engagement with complex ideas.

We will move beyond the superficial mechanics of folding paper to understand the deeper currents of human history and psychology that animate this humble object. By examining its origins and applications through anthropological, historical, and sociological frameworks, we can unlock a richer understanding of its significance. Furthermore, this exploration will culminate in a practical guide, empowering readers to not only create their own fortune tellers but to engage with the underlying principles in a tangible, hands-on manner.

Historical Echoes: Divination and Play

The impulse to predict the future is as old as humanity itself. Across cultures and epochs, individuals have sought ways to understand or influence the unfolding of events. The paper fortune teller, while a modern manifestation, echoes ancient practices of divination. Forms of prophecy, oracles, and augury were central to many ancient civilizations, from the Civilizaciones Antiguas of Greece and Rome, with their pronouncements from the Mitología Nórdica-inspired sibyls, to the intricate systems of omen-reading found in Mesopotamian cultures.

These practices, often embedded within religious or ritualistic contexts, served to provide guidance, alleviate anxiety, and legitimize authority. The desire for foresight was not always solemn; play and divination often intertwined. Games involving chance and prediction have a long lineage, offering a less formal, more accessible way to engage with the mysteries of the future.

The desire to peer into the unknown is a fundamental aspect of the human condition, manifesting in both sacred rituals and playful diversions.

The evolution of paper, and subsequently printing, democratized access to such activities. What was once the domain of priests or kings could now be replicated by anyone with a sheet of paper and a bit of ingenuity. This accessibility is key to understanding the paper fortune teller's widespread appeal.

Anthropological Lens: Ritual, Symbolism, and Social Interaction

From an anthropological viewpoint, the paper fortune teller is more than just a game; it's a miniature ritual. The act of folding the paper itself can be seen as a process of transformation, creating order from a flat plane. The colors, numbers, and "fortunes" inscribed within possess symbolic weight, tapping into collective cultural understandings and personal beliefs.

The fortune teller acts as a catalyst for social interaction. It brings people together, creating a shared experience centered around curiosity and anticipation. The process of one person operating the teller for another involves a dynamic of trust and performance. The operator holds a degree of power, shaping the experience through their actions and the pre-written fortunes. The recipient, in turn, engages by making choices, interpreting the outcomes, and suspending disbelief.

Consider the symbolic color choices. Different cultures attribute varied meanings to colors, and even within a single culture, personal associations can be strong. Similarly, the numbers chosen can evoke patterns or sequences that hold cultural significance. The "fortunes" themselves, ranging from simple predictions to playful affirmations, serve a function akin to proverbs or mottos, offering concise nuggets of perceived wisdom or amusement.

This artifact acts as a social lubricant, facilitating communication and shared moments, often in informal settings like Cultura Colombiana gatherings or Europa schoolyards.

The process mirrors elements found in more complex cultural rituals: choice, transformation, revelation, and interpretation. It’s a micro-performance of societal beliefs about fate and agency.

Sociological Insights: The Dynamics of Prediction and Belief

Sociologically, the paper fortune teller highlights our fascination with prediction and the construction of belief. In an often uncertain world, the desire for answers, even playful ones, is profound. The fortune teller provides a structured way to engage with this uncertainty.

The interaction it facilitates touches upon social stratification and power dynamics, albeit in a lighthearted manner. The operator is momentarily in a position of authority, guiding the experience. The choices made by the recipient can reflect social cues or personal preferences, subtly revealing aspects of their personality or desires.

Furthermore, the shared nature of the activity fosters a sense of community and belonging. It creates a common ground for interaction, breaking down barriers and encouraging light conversation. The very act of participating in a fortune-telling ritual, regardless of one's genuine belief in its efficacy, reinforces social bonds and shared cultural understandings.

The technology of its creation – paper folding – is itself a form of 'doing'. It’s a tangible expression of abstract ideas. This resonates with concepts explored by thinkers like Pierre Bourdieu, who examined how cultural practices and material objects reflect and shape social structures and individual habitus. The simple act of folding paper becomes a vector for transmitting cultural norms and personal beliefs.

Practical Workshop: Crafting Your Own Paper Fortune Teller

Engaging with the concepts discussed requires a hands-on approach. The "do-it-yourself" aspect of creating a paper fortune teller is not merely about craft; it’s about internalizing the process and understanding the structural logic. Follow these steps to build your own:

  1. Start with a Square Sheet of Paper: If you only have rectangular paper (like standard A4 or letter size), fold one corner down to meet the opposite edge, creating a triangle. Cut off the excess rectangular strip to leave a perfect square.
  2. Fold into a Triangle, then an Octagon: Fold the square in half diagonally to form a triangle. Unfold. Fold it in half diagonally the other way and unfold. You should have two diagonal creases forming an 'X'. Now, fold the paper in half horizontally and unfold. Then fold it in half vertically and unfold. You will have a grid of creases.
  3. Form the Base Shape: Bring the four corners of the paper to the center point, aligning them precisely. This will create a smaller square.
  4. Flip and Repeat: Flip the paper over. Bring the four new corners to the center point again, just as you did before. This will create an even smaller square.
  5. Create the Flaps: Fold the paper in half horizontally, then unfold. Fold it in half vertically, then unfold. You should now have creases that allow you to push the sides inward.
  6. Shape the Teller: Gently push the sides inwards along the creases. The center of the paper should pop up, forming four triangular "pockets" or "flaps" on one side, and four square "windows" on the other. This is your fortune teller.
  7. Decorate and Write Fortunes: On the outside of the four flaps, write different colors (e.g., Red, Blue, Green, Yellow). On the inside of these flaps (which you’ll reveal by opening them), write short, playful fortunes or affirmations.
  8. Number the Windows: On the underside of the flaps (the square "windows" you see when the teller is closed), write numbers from 1 to 8. Distribute them so each number appears once.
  9. Play the Game:
    • Ask someone to pick a color from the outside flaps.
    • Spell out the color by opening and closing the fortune teller for each letter. Move the teller in and out for each letter. For example, for "R-E-D," you might move it out, in, out.
    • Keep the teller open at the final position. Ask the person to pick one of the visible numbers.
    • Move the fortune teller in and out for the number of times they chose (e.g., if they picked 5, move it 5 times).
    • Keep the teller open at the final position. Ask them to pick another number.
    • Open the flap corresponding to that number and read the fortune written beneath it.

This tactile process reinforces the structural logic and symbolic potential of the artifact. It’s a tangible example of applying abstract concepts—choice, sequence, interpretation—in a simple, reproducible manner, embodying the spirit of hagaloustedmismo.

Frequently Asked Questions

Q1: Are there specific historical origins for the paper fortune teller?
A1: While the exact origin is difficult to pinpoint, its design likely evolved from traditional origami techniques and ancient divination practices, becoming popularized in the early 20th century with the wider availability of paper. It represents a secularized form of seeking future insights through playful means.

Q2: What is the anthropological significance of the colors and numbers used?
A2: Colors and numbers often carry symbolic weight in different cultures and personal beliefs. Their selection within the fortune teller taps into these associations, making the interaction more meaningful and engaging, even if subconsciously.

Q3: Can this activity be used for educational purposes?
A3: Absolutely. It's excellent for teaching basic origami, sequencing, following instructions, and even exploring cultural symbolism related to colors and numbers. It's a hands-on way to understand concepts like algorithms and conditional outcomes.

Q4: What makes this activity a "DIY intellectual construction"?
A4: It’s considered a "DIY intellectual construction" because it requires the user to actively engage in the creation and interpretation of meaning. By folding the paper, writing fortunes, and performing the ritual, one is not just following instructions but is actively building a small system of prediction and social interaction, mirroring how we construct understanding in other intellectual domains.

Conclusion: The Enduring Power of Interactive Artifacts

The paper fortune teller, in its deceptive simplicity, offers a rich tapestry for anthropological, historical, and sociological inquiry. It reminds us that even the most commonplace objects can embody complex human desires and cultural practices. Its construction is an act of intellectual DIY, a miniature exercise in system-building and meaning-making.

By engaging with this artifact, we not only recall nostalgic childhood moments but also connect with ancient human impulses towards understanding the future and structuring social interaction. The very act of folding, writing, and predicting transforms a simple piece of paper into a dynamic tool for communication and reflection. It stands as a testament to the enduring power of simple, interactive artifacts to encapsulate and transmit cultural knowledge and social dynamics.

We encourage you to create your own fortune teller, perhaps infusing it with contemporary insights or historical references. Share your experiences and any unique fortunes you devise in the comments below. Let the exploration continue!

La Construcción Artesanal de un Emisor de Radio FM: Una Aproximación DIY al Conocimiento Electrónico

La radiodifusión, en sus albores y en sus manifestaciones más íntimas, ha sido un campo fascinante para la experimentación y el aprendizaje. Más allá de la recepción de señales, la capacidad de generar y transmitir propia contenido radiofónico ha capturado la imaginación de aficionados y curiosos por igual. Este artículo se sumerge en la práctica del "Hazlo Tú Mismo" (DIY) aplicada a la construcción de un emisor de radio FM casero, abordando los principios electrónicos subyacentes, el contexto histórico de la radioafición y los pasos prácticos para quienes desean emprender este proyecto.

La intención de búsqueda principal de un lector interesado en este tema se sitúa en la intersección de la electrónica práctica, la historia de las telecomunicaciones y el deseo de aprendizaje autodidacta. Buscamos no solo el cómo, sino también el porqué, desentrañando la ciencia detrás de la modulación de frecuencia y su aplicación en la transmisión de audio. Este es un viaje hacia la comprensión de cómo las ondas electromagnéticas viajan por el éter y cómo podemos, con herramientas y conocimientos accesibles, participar activamente en este fenómeno.

Introducción a la Radio FM DIY

Construir tu propio emisor de radio FM no es meramente un ejercicio técnico; es una puerta de entrada al mundo de la ingeniería de radiofrecuencia y una demostración tangible de los principios que sustentan nuestras comunicaciones modernas. Este tipo de proyectos DIY, inspirados en las raíces de la radioafición, fomenta una comprensión profunda de los circuitos electrónicos y la propagación de ondas. Nos permite, además, explorar la posibilidad de crear pequeñas estaciones para fines educativos, comunitarios o simplemente por el placer de la creación.

Principios Fundamentales de un Emisor FM

Un emisor de radio FM, en su esencia, es un dispositivo que genera una onda portadora en una frecuencia específica dentro de la banda FM (generalmente entre 88 y 108 MHz) y modula esta onda con una señal de audio. La modulación de frecuencia (FM) consiste en variar la frecuencia de la onda portadora de acuerdo con la amplitud de la señal de audio. A diferencia de la modulación de amplitud (AM), la FM es menos susceptible a las interferencias y al ruido atmosférico, lo que resulta en una mayor fidelidad de audio.

Los componentes clave de un emisor FM básico suelen incluir:

  • Oscilador: Genera la onda portadora de alta frecuencia. Esto se logra típicamente con un circuito LC (inductor-condensador) donde la capacitancia o inductancia varía para establecer la frecuencia deseada.
  • Modulador: Incorpora la señal de audio al oscilador, alterando su frecuencia. Un micrófono conectado a un transistor o un circuito integrado específico puede cumplir esta función.
  • Amplificador de RF: Aumenta la potencia de la señal modulada para su transmisión.
  • Antena: Irradia la onda electromagnética al espacio.
"La radio, en sus inicios, fue un campo de experimentación para inventores y aficionados que, con pocos recursos, lograron revolucionar la comunicación a distancia. El espíritu DIY de esa época es el que buscamos revivir hoy con proyectos como este emisor FM."

Contexto Histórico: La Radioafición y la Democratización de la Transmisión

El surgimiento de la radio a finales del siglo XIX y principios del XX no fue solo un avance tecnológico, sino también un fenómeno social que democratizó la comunicación. Los primeros "radioaficionados", a menudo ingenieros autodidactas y entusiastas, fueron pioneros en la experimentación con telegrafía inalámbrica y, posteriormente, con la transmisión de voz. La radioafición, como práctica organizada, emergió de este espíritu de descubrimiento y curiosidad.

Figuras como Guglielmo Marconi, si bien un inventor profesional, se basaron en descubrimientos previos y en un entorno propicio para la innovación. El acceso a componentes electrónicos, aunque rudimentario al principio, permitió a muchos construir sus propios equipos. El desarrollo de la válvula termoiónica (tubo de vacío) y, más tarde, del transistor, revolucionó las posibilidades, haciendo los equipos más pequeños, eficientes y accesibles. Este legado de exploración accesible es el que inspira la construcción de un emisor FM en el hogar, permitiendo a los aficionados contemporáneos experimentar los mismos principios fundamentales.

En la actualidad, aunque la radiodifusión comercial está fuertemente regulada, el espíritu de la radioafición persiste. Proyectos DIY como este emisor FM ofrecen una vía para el aprendizaje práctico, sin fines comerciales o de interferencia con servicios licenciados, centrados puramente en la educación y la experimentación técnica.

Componentes Clave para tu Emisor

Para emprender la construcción de un emisor de radio FM básico, necesitarás reunir una serie de componentes electrónicos. La lista puede variar ligeramente según el diseño específico del circuito, pero generalmente incluirá:

  • Transistores: Componentes semiconductores esenciales para la amplificación y la oscilación. Modelos comunes para RF como el 2N3904 o BC547 pueden ser útiles, aunque diseños más avanzados pueden requerir transistores específicos para frecuencias más altas.
  • Capacitores: De diferentes valores (picofaradios, nanofaradios) y tipos (cerámicos, electrolíticos), necesarios para el filtrado, el acoplamiento y la sintonización del circuito oscilador. Los capacitores variables son útiles para ajustar la frecuencia de transmisión.
  • Resistencias: Componentes pasivos para limitar la corriente, polarizar transistores, etc. Sus valores se expresan en ohmios.
  • Inductores (Bobinas): Cruciales para la formación del circuito resonante LC que determina la frecuencia de operación. A menudo, estas se construyen enrollando alambre de cobre esmaltado alrededor de un núcleo (aire, ferrita).
  • Micrófono: Para captar la señal de audio. Puede ser un micrófono de condensador o dinámico, adaptado a la impedancia de entrada del circuito.
  • Batería o Fuente de Alimentación: Para proporcionar la energía necesaria al circuito.
  • Placa de Circuito Impreso (PCB) o Protoboard: Para montar y conectar los componentes. Una protoboard es ideal para prototipos y aprendizaje, mientras que una PCB ofrece mayor estabilidad.
  • Antena: Un trozo de alambre rígido (generalmente de longitud calculada para la frecuencia de operación) que irradiará la señal.

Es fundamental consultar un diagrama esquemático específico del emisor que se desee construir. Los esquemas detallados se pueden encontrar en manuales de electrónica, sitios web especializados en hagaloustedmismo y foros de radioaficionados.

Guía Práctica DIY: Construyendo tu Emisor de Radio FM

A continuación, se presenta una guía paso a paso genérica para la construcción de un emisor de radio FM simple. Recuerda que la precisión en el montaje y la calidad de los componentes son cruciales para el éxito.

  1. Selecciona un Esquema: Busca un esquema de emisor de FM simple y bien documentado, preferiblemente uno diseñado para principiantes. Asegúrate de que incluya una lista detallada de componentes.
  2. Reúne los Componentes: Adquiere todos los componentes electrónicos especificados en el esquema. Presta atención a las tolerancias y especificaciones (voltaje, potencia, frecuencia).
  3. Prepara la Base de Montaje: Si utilizas una protoboard, identifica los puntos de conexión. Si vas a soldar en una placa universal o PCB, organiza los componentes.
  4. Monta el Oscilador: Este es el corazón del emisor. Conecta cuidadosamente los componentes del circuito LC (inductor y capacitor/capacitores variables) junto con el transistor que actuará como oscilador. Asegúrate de las polaridades si usas capacitores electrolíticos.
  5. Integra el Modulador: Conecta el micrófono al circuito oscilador a través de los componentes de acoplamiento y polarización necesarios. Un capacitor puede aislar la corriente continua de la señal de audio.
  6. Añade la Etapa de Amplificación (Opcional pero Recomendado): Si el diseño incluye un amplificador de RF, monta los componentes correspondientes. Esto mejorará el alcance de tu transmisión.
  7. Conecta la Antena: Solda o conecta un tramo de alambre (aproximadamente 75 cm para la banda de FM, pero consulta las fórmulas de longitud de onda para tu frecuencia específica) a la salida del circuito.
  8. Alimenta el Circuito: Conecta la fuente de alimentación o la batería, asegurándote de la polaridad correcta.
  9. Prueba y Ajuste: Enciende el circuito y utiliza un receptor de radio FM cercano sintonizado en un extremo libre de la banda (ej. 88.1 MHz). Ajusta el capacitor variable del oscilador hasta que escuches la señal de tu emisor. Si conectaste una fuente de audio (ej. reproductor MP3 con salida de línea, otro micrófono), deberías poder escucharla modulando la portadora.
  10. Optimiza la Antena: Experimenta con la posición y longitud de la antena para mejorar la calidad de la señal recibida.
"La electrónica, vista desde una perspectiva DIY, se convierte en un lenguaje universal. Cada componente, cada conexión, es una palabra en la sintaxis de la tecnología que nos permite dar vida a nuestras ideas."

Consideraciones Legales y Éticas

Es crucial entender que la transmisión de radiofrecuencia está sujeta a regulaciones estrictas en la mayoría de los países. Operar un emisor de FM sin la licencia adecuada o en frecuencias no permitidas puede acarrear sanciones legales y causar interferencias perjudiciales a servicios de radiodifusión, comunicaciones de emergencia o aeronáuticas.

Este proyecto DIY se enfoca en el aprendizaje y la experimentación en un entorno controlado, con potencias de transmisión muy bajas y para distancias cortas (a menudo solo unos pocos metros). Está diseñado para fines educativos y personales, y no para interferir con las bandas de frecuencia licenciadas. Consulta siempre la legislación local sobre radioafición y transmisión de RF antes de operar cualquier dispositivo de este tipo.

Para una exploración más profunda de la teoría y práctica de la radio, se recomienda consultar recursos como la ARRL (The National Association for Amateur Radio), que ofrece una gran cantidad de información sobre licencias, reglamentos y técnicas para radioaficionados.

Preguntas Frecuentes

¿Cuál es el alcance típico de un emisor de FM casero?

El alcance de un emisor de FM casero construido con componentes básicos suele ser muy limitado, a menudo solo de unos pocos metros (10-50 metros), dependiendo de la potencia, la calidad del diseño, la antena y las condiciones ambientales.

¿Necesito una licencia para construir y operar este emisor?

Para operar un emisor que irradie señales de radiofrecuencia al aire, generalmente se requiere una licencia, como la de radioaficionado. Sin embargo, para experimentación en un espacio privado y con potencia extremadamente baja, las regulaciones pueden ser más laxas, pero es fundamental verificar la legislación local. Este proyecto se enfoca en el aprendizaje, no en la operación de una estación de radiodifusión.

¿Qué tipo de antena es la más adecuada?

Para un emisor de FM simple, una antena dipolo de media onda o incluso un simple trozo de alambre de longitud calculada para la frecuencia de operación (aproximadamente 75 cm para 100 MHz) suele ser suficiente para demostraciones de corto alcance.

¿Puedo usar este emisor para una "estación de radio" comunitaria?

Si bien la idea es atractiva, la operación de una estación de radio comunitaria requiere licencias específicas y el cumplimiento de regulaciones de transmisión. Este emisor DIY es principalmente para fines educativos y experimentales en un entorno privado y de bajo impacto.

La construcción de un emisor de radio FM es una actividad gratificante que combina la curiosidad intelectual con la aplicación práctica. Nos permite no solo entender los principios de la modulación y la propagación de ondas, sino también participar activamente en la creación de tecnología. Este viaje al corazón de la radiofrecuencia, guiado por el espíritu DIY, es una invitación a explorar, aprender y, quizás, a encontrar una nueva pasión en el vasto mundo de la electrónica y las telecomunicaciones.

Energía Casera DIY: Construyendo Baterías Sencillas y Económicas

En el vasto panorama de la autosuficiencia y la exploración de fuentes alternativas de energía, el espíritu del "Hazlo Tú Mismo" (DIY, por sus siglas en inglés) resuena con una fuerza particular. Inspirados por la ingeniosidad humana a lo largo de la historia, hoy nos adentramos en el fascinante mundo de la generación de energía eléctrica a pequeña escala, explorando métodos caseros que demuestran que la electricidad no siempre requiere de grandes infraestructuras o costosas facturas. Este artículo se sumerge en la construcción práctica de baterías DIY, ofreciendo una perspectiva antropológica y sociológica sobre la relación del ser humano con la energía, y cómo la democratización del conocimiento permite replicar y adaptar tecnologías ancestrales y modernas.

Nuestro objetivo es desmitificar la generación de energía eléctrica básica, proporcionando tanto el conocimiento conceptual como las instrucciones prácticas para que nuestros lectores puedan experimentar de primera mano. Analizaremos la viabilidad de obtener energía con recursos cotidianos, demostrando que la curiosidad intelectual y un enfoque proactivo pueden abrir puertas a una mayor independencia energética, incluso en circunstancias limitadas. Abordaremos diversas metodologías, desde las más simples hasta algunas con resonancias históricas, invitando a la reflexión sobre el concepto de "energía libre" o de bajo costo como un ideal alcanzable a través de la aplicación del conocimiento.

Introducción al DIY Energético

La búsqueda de independencia y autosuficiencia es una constante antropológica. En la era moderna, esta búsqueda se traduce a menudo en la exploración de cómo generar nuestra propia energía. El concepto de "energía libre", aunque controvertido en términos de física, puede interpretarse en el contexto del DIY como la capacidad de generar energía útil a partir de recursos abundantes y de bajo costo, minimizando la dependencia de las redes convencionales. Este enfoque no solo responde a necesidades prácticas, sino que también fomenta una comprensión más profunda de los principios científicos y tecnológicos que sustentan nuestro mundo.

Históricamente, la humanidad ha recurrido a ingeniosos métodos para satisfacer sus necesidades energéticas. Desde el uso del fuego hasta la invención de la rueda, la innovación ha sido impulsada por la observación, la experimentación y la adaptación. En este sentido, la construcción de baterías caseras es una manifestación contemporánea de este impulso, permitiéndonos reconectar con los fundamentos de la electricidad de una manera tangible y educativa. Nos permite cuestionar, como se sugiere en la idea de energía libre, los límites de lo que consideramos posible.

La Pila de Patatas: Un Clásico Educativo

Uno de los experimentos más emblemáticos para demostrar los principios básicos de una celda voltaica es la llamada "pila de patatas". Este montaje, sorprendentemente eficaz para encender un pequeño LED o un buzzer, utiliza materiales fácilmente accesibles: patatas, clavos de zinc (o galvanizados) y monedas de cobre. La patata actúa como electrolito, gracias a su contenido de ácido fosfórico y agua, facilitando la migración de iones.

Materiales necesarios:

  • Varias patatas (cuantas más, mayor voltaje).
  • Clavos de zinc (o tornillos galvanizados).
  • Monedas de cobre (o alambre de cobre).
  • Cables conductores con pinzas de cocodrilo.
  • Un LED de bajo consumo o un voltímetro.

Procedimiento:

  1. Corta las patatas por la mitad o úsalas enteras.
  2. Inserta un clavo de zinc en una patata y una moneda de cobre en otra patata, asegurándote de que no se toquen dentro de la patata.
  3. Conecta el clavo de zinc de una patata al extremo positivo de un cable.
  4. Conecta la moneda de cobre de esa misma patata al extremo negativo de otro cable.
  5. Repite el proceso, conectando el extremo positivo del cable de la moneda de cobre de la primera patata al extremo negativo de un clavo de zinc de una segunda patata. Esto se conoce como "poner en serie" las celdas para aumentar el voltaje.
  6. Continúa enlazando las patatas de esta manera hasta obtener el voltaje deseado (generalmente, una patata produce alrededor de 0.5V).
  7. Finalmente, conecta los cables libres (el del zinc de la primera patata y el del cobre de la última) al LED o voltímetro. Si la polaridad es correcta, el LED debería encenderse o el voltímetro debería registrar una lectura.

Este experimento, aunque simple, ilustra perfectamente la conversión de energía química en eléctrica a través de una reacción redox. Es una excelente introducción al concepto de batería.

Batería de Limón, Hierro y Cobre: Fundamentos y Montaje

Similar a la pila de patatas, la batería de limón utiliza un ácido orgánico (ácido cítrico) para actuar como electrolito. El limón, al igual que la patata, es un conductor iónico ideal para demostraciones sencillas de generación eléctrica. Los metales de zinc y cobre, al tener diferentes potenciales electroquímicos, crean la diferencia de potencial necesaria para impulsar un flujo de electrones.

Materiales:

  • Limones frescos (uno o varios).
  • Tiras de zinc (o un tornillo galvanizado).
  • Tiras de cobre (o una moneda de cobre).
  • Cables conductores con pinzas de cocodrilo.
  • Un LED de bajo consumo o un voltímetro.

Montaje:

  1. Rueda el limón sobre una superficie firme para romper las membranas internas y facilitar la liberación del jugo.
  2. Inserta la tira de zinc en un lado del limón, sin que toque la otra tira metálica.
  3. Inserta la tira de cobre en el otro lado del limón.
  4. Conecta un cable con pinza de cocodrilo al trozo de zinc (ánodo) y otro cable al trozo de cobre (cátodo).
  5. Conecta los otros extremos de los cables al LED o al voltímetro.
  6. Para obtener un voltaje mayor, puedes "poner en serie" varios limones, conectando el zinc de un limón al cobre del siguiente.

Este montaje demuestra de manera clara y accesible los principios de una celda electroquímica. La simplicidad de los materiales lo convierte en un proyecto ideal dentro del ámbito del DIY y la educación científica.

Principios Electroquímicos de la Batería de Limón

La operación de la batería de limón se basa en una reacción electroquímica. Cuando el zinc y el cobre se introducen en el electrolito ácido del limón, ocurren las siguientes reacciones:

  • En el ánodo (Zinc): El zinc es más reactivo que el cobre y tiende a oxidarse, perdiendo electrones y formando iones de zinc (Zn²⁺) que se disuelven en el jugo del limón.
    Zn(s) → Zn²⁺(aq) + 2e⁻
  • En el cátodo (Cobre): Los electrones liberados por el zinc viajan a través del circuito externo hacia el cobre. Allí, reaccionan con los iones de hidrógeno (H⁺) presentes en el ácido del limón, formando gas hidrógeno (H₂).
    2H⁺(aq) + 2e⁻ → H₂(g)

Los iones de zinc y los iones de hidrógeno migran a través del electrolito para completar el circuito interno. La diferencia de potencial generada entre el zinc y el cobre impulsa el flujo de electrones, creando una corriente eléctrica. La tensión generada por una sola celda de limón es de aproximadamente 0.9-1V. Al conectar varias celdas en serie, se puede aumentar este voltaje para alimentar dispositivos que requieran un poco más de energía, como un pequeño LED.

"La belleza de estos experimentos reside en su capacidad para materializar conceptos abstractos, transformando la teoría electroquímica en una experiencia práctica y memorable."

La Misteriosa Batería de Bagdad: Evidencia de Tecnología Antigua

Existe un artefacto arqueológico fascinante conocido como la "Batería de Bagdad", datado aproximadamente entre los años 226 a.C. y 650 d.C. Se trata de vasijas de barro cocido que contienen un cilindro de cobre y una varilla de hierro en su interior. Si se hubiera llenado con un electrolito líquido, como vinagre o jugo de uva (abundantes en la época), este conjunto podría haber funcionado como una pila galvánica rudimentaria.

Posible funcionamiento:

  • La vasija actuaría como contenedor para el electrolito.
  • El cilindro de cobre y la varilla de hierro actuarían como los electrodos.
  • Un electrolito ácido (como vinagre) facilitaría la reacción electroquímica entre el hierro y el cobre, generando una pequeña corriente eléctrica.

El propósito exacto de estos objetos sigue siendo objeto de debate académico. Algunas teorías sugieren que podrían haber sido utilizados para la galvanoplastia (recubrimiento de metales con una fina capa de otro metal, como oro o plata), procesos de curación o incluso para fines rituales. Independientemente de su uso, su existencia plantea interrogantes sobre el nivel de conocimiento tecnológico en las civilizaciones antiguas y cómo la experimentación con materiales podría haber llevado a descubrimientos inesperados.

Este descubrimiento se alinea con la idea de que la innovación y la aplicación práctica de principios naturales no son exclusivas de la era moderna. Es un testimonio de la curiosidad humana y su habilidad para manipular el entorno, un pilar fundamental del hagaloustedmismo intelectual y práctico.

Perspectivas Históricas y Antropológicas

Desde una perspectiva antropológica, la capacidad de generar y controlar la energía ha sido un factor determinante en el desarrollo de las sociedades humanas. La domesticación del fuego, la invención de la rueda, el dominio de la electricidad; cada hito energético ha reconfigurado la forma en que vivimos, trabajamos y nos relacionamos con nuestro entorno. Los experimentos DIY con baterías caseras, aunque a una escala mínima, nos conectan con esta larga historia de ingenio energético.

El estudio de artefactos como la Batería de Bagdad nos invita a reconsiderar las narrativas lineales del progreso tecnológico. Demuestra que culturas antiguas poseían conocimientos sofisticados, a menudo transmitidos oralmente o a través de prácticas que hoy identificamos como "DIY". La aparente simplicidad de estas tecnologías no disminuye su importancia; al contrario, resalta la elegancia de encontrar soluciones funcionales con recursos accesibles.

"La historia de la tecnología energética es, en esencia, la historia de la adaptabilidad humana y la búsqueda incesante de mejorar las condiciones de vida a través de la manipulación inteligente de las fuerzas naturales."

En sociología, la democratización del conocimiento y la tecnología, facilitada por plataformas como los blogs y los foros en línea, juega un papel crucial. Permite que técnicas y saberes que antes estaban restringidos a círculos especializados ahora sean accesibles para un público amplio. Esto empodera a individuos y comunidades, fomentando un espíritu de colaboración y aprendizaje mutuo en torno a temas como la DIY y la autosuficiencia.

Consideraciones de Seguridad y Ética DIY

Si bien los experimentos presentados en este artículo utilizan materiales de bajo voltaje y, en general, son seguros, es crucial abordar la construcción de cualquier dispositivo energético con una mentalidad proactiva hacia la seguridad.

  • Supervisión: Los menores de edad deben realizar estos experimentos bajo la supervisión de un adulto.
  • Materiales: Asegúrate de identificar correctamente los materiales. Evita el contacto prolongado con electrolitos ácidos o bases fuertes si decides experimentar con alternativas más potentes.
  • Cortocircuitos: Evita cortocircuitar las baterías, incluso las caseras, ya que pueden generar calor o dañar los componentes.
  • Expectativas realistas: Las baterías caseras generadas con patatas o limones producen cantidades muy pequeñas de energía, suficientes para demostraciones educativas. No están diseñadas para alimentar dispositivos de consumo doméstico.

La ética en el DIY implica no solo la seguridad personal, sino también la responsabilidad en la difusión y aplicación del conocimiento. Fomentar un uso constructivo y educativo de estas técnicas es fundamental.

Preguntas Frecuentes

P1: ¿Es realmente posible obtener energía "gratis" con estos métodos?

R1: El término "energía gratis" es una simplificación. Estos métodos permiten generar energía eléctrica utilizando materiales de muy bajo costo o reutilizados, minimizando el gasto económico directo. Sin embargo, requieren un inversión de tiempo, esfuerzo y, a veces, de materiales iniciales. El concepto se enfoca más en la autosuficiencia y la reducción de costos que en la ausencia total de recursos.

P2: ¿Puedo usar estas baterías caseras para cargar mi teléfono móvil?

R2: No. Las baterías caseras como las de patata o limón producen un voltaje y una corriente muy bajos, insuficientes para cargar un dispositivo moderno como un teléfono móvil, que requiere voltajes y corrientes mucho mayores y más estables.

P3: ¿Qué otros materiales caseros podrían funcionar como electrolito?

R3: Otros ácidos débiles o soluciones salinas pueden funcionar. Ejemplos incluyen vinagre (ácido acético), agua salada (NaCl disuelto en agua), o incluso bebidas carbonatadas que contienen ácido fosfórico o cítrico. La clave es la presencia de iones móviles que faciliten la conducción eléctrica.

P4: ¿Cómo se relaciona la Batería de Bagdad con las baterías modernas?

R4: La Batería de Bagdad es un precursor conceptual de las baterías modernas, ya que ambas funcionan bajo el principio de una celda electroquímica que convierte energía química en eléctrica mediante reacciones redox. Sin embargo, las baterías modernas utilizan materiales más eficientes, electrolitos más estables y están diseñadas para una mayor duración y capacidad energética.

Conclusión y Reflexión Final

La exploración de cómo construir baterías caseras, desde la humilde pila de patatas hasta las intrigantes reminiscencias de la Batería de Bagdad, nos ofrece una valiosa perspectiva sobre la relación entre la humanidad, la energía y la tecnología. Estos proyectos DIY no solo son demostraciones prácticas de principios científicos fundamentales, sino que también son un eco de la ingeniosidad humana a lo largo de la historia, recordándonos que la innovación a menudo surge de la curiosidad y la experimentación con los recursos disponibles.

Si bien estos métodos caseros tienen limitaciones prácticas en términos de potencia y aplicabilidad generalizada, su valor educativo y conceptual es innegable. Nos invitan a cuestionar nuestras dependencias tecnológicas, a comprender mejor el mundo que nos rodea y a fomentar un espíritu de autosuficiencia y descubrimiento. La democratización del conocimiento, facilitada por la divulgación académica y las comunidades en línea, permite que estas exploraciones continúen, inspirando a nuevas generaciones de constructores y pensadores.

Invitamos a nuestros lectores a compartir sus propias experiencias, descubrimientos o métodos para generar energía casera en la sección de comentarios. ¿Han intentado alguno de estos experimentos? ¿Conocen otras técnicas ingeniosas para obtener energía de forma alternativa o económica? Su participación enriquece nuestro entendimiento colectivo.

El Arte de la Autodefensa DIY: Construye tus Propios Nunchakus al Estilo Bruce Lee

La fascinación por la autodefensa y la habilidad manual ha coexistido a lo largo de la historia humana. Desde las herramientas rudimentarias de la prehistoria hasta las complejas tecnologías modernas, la capacidad de crear y dominar nuestros propios instrumentos de protección o de expresión física es un pilar de la agencia individual. En este contexto, el movimiento "Hazlo Tú Mismo" (DIY), que celebra la autonomía y la destreza práctica, encuentra un eco profundo en disciplinas que combinan el desarrollo físico, la concentración mental y, en ocasiones, la estética marcial. Este artículo se adentra en la filosofía subyacente a la creación de herramientas de autodefensa caseras, centrándose en un icono: los nunchakus. Exploraremos cómo la aplicación práctica de principios básicos de ingeniería y el acceso a materiales comunes permiten replicar, con un presupuesto mínimo, un instrumento asociado a leyendas como Bruce Lee. Más allá de la mera fabricación, analizaremos el valor intrínseco de este proceso para el cultivador de artes marciales y el entusiasta del DIY intelectual.

La Tradición y la Adaptación: Un Vistazo Histórico a los Nunchakus

Los nunchakus, aunque popularizados globalmente por la figura icónica de Bruce Lee, tienen raíces que se hunden en la historia de las artes marciales de Okinawa. Originalmente, se teoriza que surgieron de herramientas agrícolas, como el kama (hoz) o el sansetsukon (una variante de tres palos), adaptadas como armas improvisadas en épocas de prohibición de armas por parte de las autoridades japonesas. La simplicidad de su diseño —dos palos unidos por una cadena o cuerda— es engañosa, pues su manejo efectivo requiere una coordinación excepcional, fuerza y una profunda comprensión de la física del movimiento. La democratización de estas herramientas, permitiendo que cualquier individuo con inclinación práctica pueda construir las suyas, no solo honra esta herencia de ingenio, sino que también la actualiza para el practicante moderno.

La Filosofía DIY: Autonomía, Costo y Conocimiento

El espíritu del "Hazlo Tú Mismo" trasciende la simple economía. Representa un empoderamiento a través del conocimiento aplicado y la autosuficiencia. En el ámbito de las armas de autodefensa, esto se traduce en la capacidad de comprender íntimamente el funcionamiento de un instrumento, adaptarlo a las propias necesidades y, crucialmente, poseerlo sin depender de costosos intermediarios comerciales. La intención de búsqueda de quien se embarca en un proyecto como este es multifacética: desde el deseo de reducir el precio asociado a equipos de práctica de artes marciales, hasta la profunda satisfacción intelectual de desmantelar un concepto (la fabricación de nunchakus) y reconstruirlo con recursos accesibles. Esta metodología, aplicada a cualquier hagaloustedmismo, refuerza la conexión entre el cuerpo, la mente y el entorno material.

Guía Práctica: Construyendo tus Nunchakus Caseros

La construcción de nunchakus caseros es un proyecto accesible que ejemplifica los principios del DIY. Siguiendo instrucciones precisas y utilizando materiales fácilmente disponibles en cualquier ferretería, es posible crear un par funcional y seguro para la práctica. Este proceso no solo resulta en un objeto físico, sino que también cultiva una comprensión más profunda de las mecánicas y la ingeniería básica, permitiendo al practicante de artes marciales, como aquellos que aspiran a la fluidez de Bruce Lee, entrenar sin una inversión económica prohibitiva.

Materiales Esenciales para Nunchakus DIY

Para embarcarse en la fabricación de tus propios nunchakus, se requiere una selección cuidadosa de materiales que garantice tanto la durabilidad como la seguridad. La elección de cada componente es crucial para el resultado final.

  • Cadena: Aproximadamente 6 eslabones, sumando un largo total de 11 cm. Es indispensable añadir un eslabón adicional que deberá ser soldado para unir las dos secciones principales de la cadena a las arandelas.
  • Madera: Dos secciones cilíndricas de madera, cada una con 30 cm de largo y 3 cm de diámetro. Maderas duras como el sapán o materiales resistentes como el bambú son ideales para asegurar la longevidad y resistencia del instrumento.
  • Tornillos: Se requieren dos tornillos para madera, cuya longitud sea adecuada para fijar la cadena al extremo de los cilindros de madera sin atravesarlos completamente.
  • Arandelas: Dos arandelas metálicas. Es vital que el diámetro interior de estas arandelas sea lo más ajustado posible al diámetro de los tornillos, y que su diámetro exterior no exceda el de las secciones de madera para una integración segura.

El Proceso Detallado: De Materiales a Nunchakus

La manufactura de tus nunchakus caseros se divide en pasos lógicos, cada uno diseñado para asegurar la integridad estructural y la funcionalidad del arma.

1. Preparación de la Madera

El primer paso consiste en cortar las dos secciones de madera a la medida especificada de 30 cm de longitud. Una vez cortadas, es fundamental lijarlas meticulosamente para eliminar cualquier aspereza o astilla, asegurando una superficie lisa y segura al tacto.

2. Perforación para Tornillos

En uno de los extremos de cada palo de madera, se debe realizar un agujero. Este agujero debe ser perpendicular y dirigirse hacia el centro del palo, permitiendo que los tornillos se asienten firmemente. Idealmente, se debe utilizar una broca del mismo diámetro que el tornillo y asegurarse de que la perforación no exceda la longitud del tornillo para evitar que atraviese la madera.

3. Ensamblaje de la Cadena

Este paso requiere precisión y, si no se tiene experiencia, la ayuda de alguien hábil en soldadura. Tome el eslabón adicional de la cadena y córtelo por la mitad. Luego, suelde cada mitad a una de las arandelas. Es crucial, antes de realizar la soldadura, pasar a través de la arandela el extremo de la cadena principal que unirá las dos partes de madera. Este método asegura que la cadena quede correctamente fijada a las arandelas.

Si no posee experiencia en soldadura, es altamente recomendable buscar la asistencia de un profesional o un amigo con las habilidades necesarias para garantizar una unión fuerte y segura.

4. Unión de la Cadena a la Madera

Una vez que la cadena y las arandelas estén preparadas y la soldadura se haya enfriado, proceda a atornillar los extremos de la cadena (a través de las arandelas) a los agujeros previamente realizados en los palos de madera. Asegure cada tornillo firmemente para evitar cualquier movimiento o desprendimiento futuro.

5. Verificación de Seguridad

Antes de considerar los nunchakus listos para su uso, es imperativo realizar una prueba de resistencia. Tire de cada extremo de la cadena y de los tornillos para asegurarse de que todo esté firmemente sujeto. La estabilidad es clave para evitar accidentes durante la práctica.

La seguridad es primordial. Unos nunchakus mal ensamblados no solo son ineficaces, sino que pueden ser peligrosos tanto para el usuario como para quienes le rodean. Verifique cada unión dos veces.

Consideraciones Éticas y Legales en la Creación de Armas

Si bien la fabricación de herramientas de autodefensa como los nunchakus puede ser un proyecto gratificante y educativo bajo la premisa del DIY, es fundamental abordar este tema con responsabilidad. La posesión y el porte de este tipo de implementos pueden estar sujetos a regulaciones legales específicas en diferentes jurisdicciones. Es responsabilidad del individuo informarse sobre la legislación local vigente. Además, el uso de cualquier arma, incluso para fines de práctica, debe realizarse en entornos controlados y con el debido conocimiento técnico para prevenir lesiones. La filosofía subyacente de las artes marciales siempre ha enfatizado el control, la disciplina y el respeto, principios que deben guiar tanto la creación como el uso de estas herramientas.

Para aquellos que deseen profundizar aún más en el mundo de las armas personalizadas y el hagaloustedmismo, existen recursos adicionales. Un libro que explora la fabricación de más de 50 armas DIY puede ser una excelente fuente de inspiración y conocimiento práctico. (Descarga este libro aquí: [Enlace al Libro DIY - Reemplazar con URL real]).

Preguntas Frecuentes sobre Nunchakus DIY

  • ¿Son seguros los nunchakus hechos en casa? Sí, si se siguen las instrucciones cuidadosamente y se utilizan materiales de calidad. La verificación de seguridad al final del proceso es crucial.
  • ¿Cuál es el costo aproximado de fabricar estos nunchakus? Con materiales básicos, el costo ronda los 15 dólares (aproximadamente 30.000 pesos colombianos), lo que los hace considerablemente más barato que comprar unos prefabricados.
  • ¿Puedo usar cualquier tipo de madera? Se recomiendan maderas duras como sapán o bambú por su resistencia. Evite maderas blandas o propensas a astillarse fácilmente.
  • ¿Es legal portar nunchakus caseros? La legalidad varía según la región. Investigue la legislación local antes de portar o exhibir públicamente estas herramientas.

La creación de tus propios nunchakus es más que un simple proyecto de bricolaje; es una inmersión en la filosofía de la autosuficiencia, la comprensión de la mecánica y la conexión con la rica historia de las artes marciales. Al dominar la construcción de estas herramientas, no solo adquieres un equipo de práctica funcional y económico, sino que también cultivas habilidades valiosas y una apreciación más profunda por el ingenio humano. ¿Qué otros proyectos DIY te inspiran? Comparte tus ideas y experiencias en los comentarios.